
Tie knots refer to the different methods of tying a necktie to create a distinct design that rests at the collar. Tie knots allow you to showcase your style choices and maintain functionality with your outfit. Each type of knot offers a unique aesthetic that complements conventional and adventurous tastes.
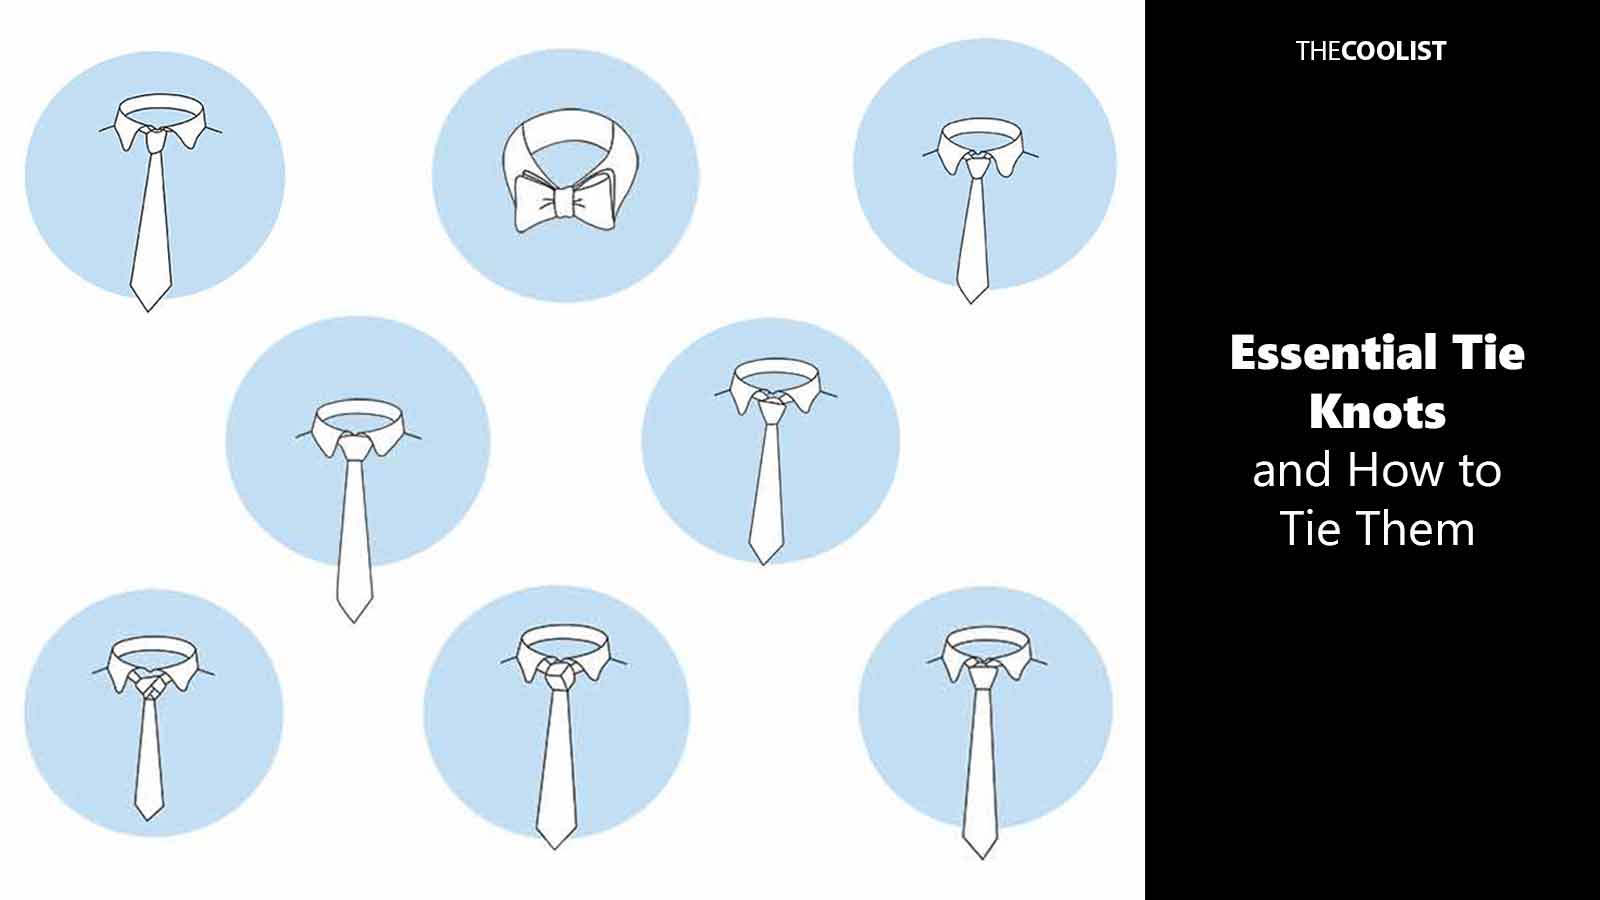
Tie knots have helped men show individuality and power throughout history. A suit and tie remain an evergreen way of looking sharp and confidently stepping out. Tying a necktie is a formative experience that shouldn’t be left to guesswork. Knowing how to tie different knots reflects a person’s grooming skills and ability to accessories, which can affect your professional or social life.
While tie knots are a functional aspect of wearing a necktie, they can be a significant aspect of personal fashion. Mastering different knots shows you have a bold sense of style and sophistication. You can liven up your day-to-day look with a unique knot or keep it simple for conventional elegance. However, no matter how you wear your tie, you’ll need to know how to securely tie it. To this end, TheCoolist has collaborated with The Knots Manual to bring you illustrated tutorials on how to tie the best necktie knots.
Below, we outline the essential tie knows, explain how to tie them, and offer suggestions for more adventurous fashion choices.
- Four-in-hand knot: A simple and classic knot, the Four-in-Hand is characterized by its asymmetrical shape and is suitable for most occasions. It’s easy to tie, making it a popular choice for beginners.
- Half-Windsor knot: The Half-Windsor is a symmetrical and triangular knot that is slightly larger than the Four-in-Hand. It’s versatile, working well with most shirt collars and suitable for a variety of occasions.
- Full Windsor knot: The Full Windsor knot is a large, symmetrical, and wide triangular knot. It’s best suited for formal events and requires a longer tie due to its complex tying method.
- Bow tie: A bow tie knot creates a symmetrically tied bow shape. It’s commonly used for formal events and is distinct for its butterfly-like appearance.
- Prince Albert knot: The Prince Albert knot is a variation of the Four-in-Hand with a double wrap around the active end, creating a slightly thicker and elongated look. It’s suitable for most occasions and collars.
- Pratt (Shelby) knot: The Pratt (Shelby) knot is a medium-sized, symmetrical knot that is efficient and versatile. It starts with the tie inside-out and works well with light and medium-weight fabrics.
- Eldredge knot: The Eldredge knot is a complex and intricate knot, characterized by its multiple overlapping layers. It’s a modern, unconventional choice, offering a distinctive and stylish look.
- Trinity knot: The Trinity knot is a decorative and intricate style, characterized by its three-way symmetry. It creates a striking pattern and is more of a novelty knot for special occasions.
1. Four-in-Hand Knot
The four-in-hand knot is the world’s most popular tie knot due to its simplicity and understated elegance. The primary allure of the four-in-hand is its slender, slightly asymmetrical form that is adaptable to both professional and informal events. Its asymmetry imparts a touch of casual sophistication that makes it stand out against symmetrical knots.
The four-in-hand knot traces its origins to the 19th century as a popular method of tie knotting by members of the Four-in-Hand Club in London. The club was known for its equestrian pursuits and popularized this style while handling the reins of four-horse carriages (hence the knot’s reference to having four reins in hand). It has maintained its relevance over the years as a symbolic blend of practicality and effortless style quintessential to British gentleman’s attire.
The four-in-hand knot is renowned for its ease of tying, making it an excellent starting point for beginners in the art of tie-knotting. Its simple tying process involves fewer steps compared to more intricate knots like the Windsor. This knot is best suited for narrow to medium-width ties and works exceptionally well with most shirt collars. It especially complements narrow-spread collars and suits with a more streamlined fit that enhances the wearer’s overall silhouette.
How to tie a four-in-hand knot
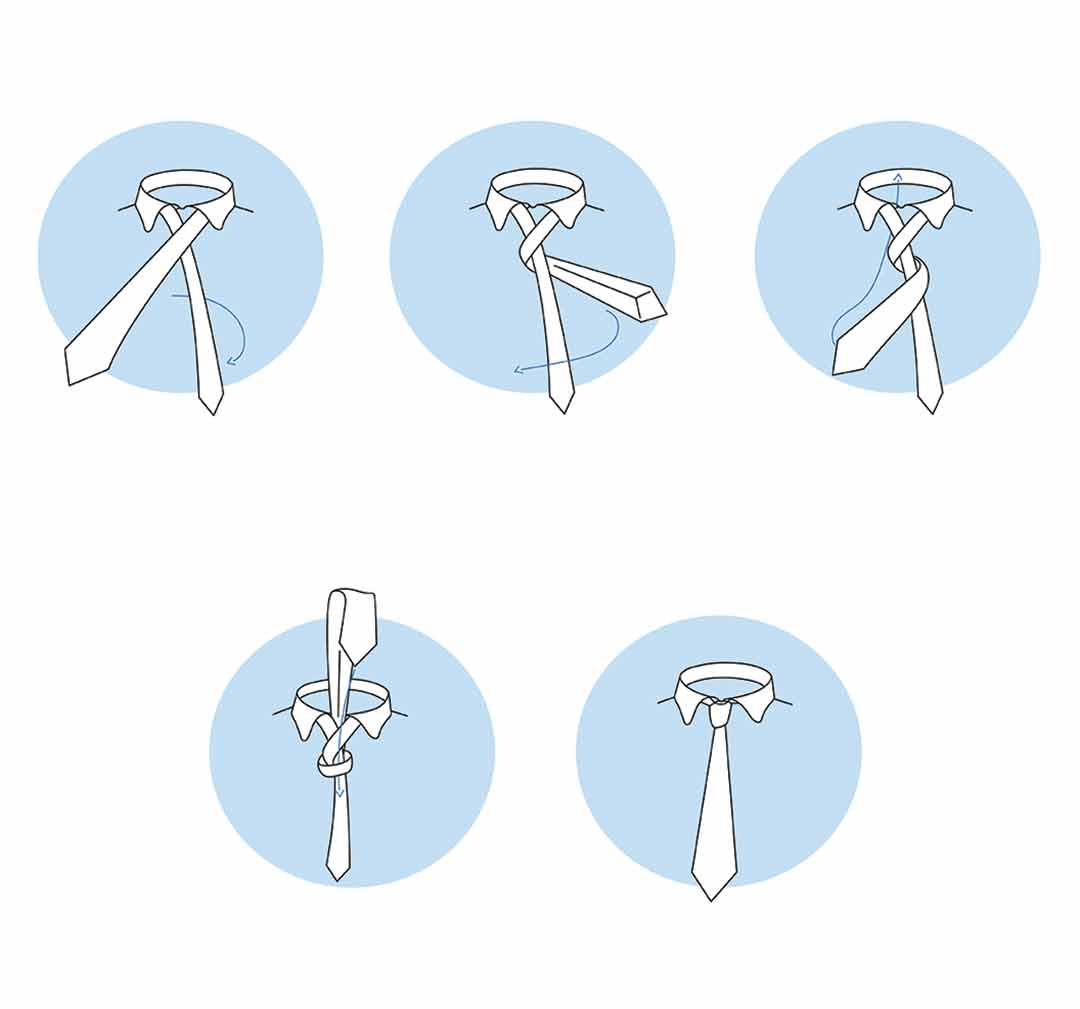
Follow the instructions below to learn how to tie a four-in-hand knot.
- Position the tie: Place the tie around your neck with the wide end on your right, extending about 12 inches below the narrow end on your left.
- Cross over: Cross the wide end over the narrow end.
- Wrap around: Bring the wide end around and behind the narrow end.
- Loop the wide end and thread through: Take the wide end up and pull it through the loop around your neck. Bring the wide end down through the knot in the front.
- Tighten and adjust: Hold the narrow end and slide the knot upward to tighten. Adjust the knot to make sure it’s centered and symmetrical. Ensure an appropriate tie length with the wide end just touching the belt buckle. Special attention should be paid to the small indentation below the knot (known as the dimple) which adds a touch of sophistication to the final look of the four-in-hand knot.
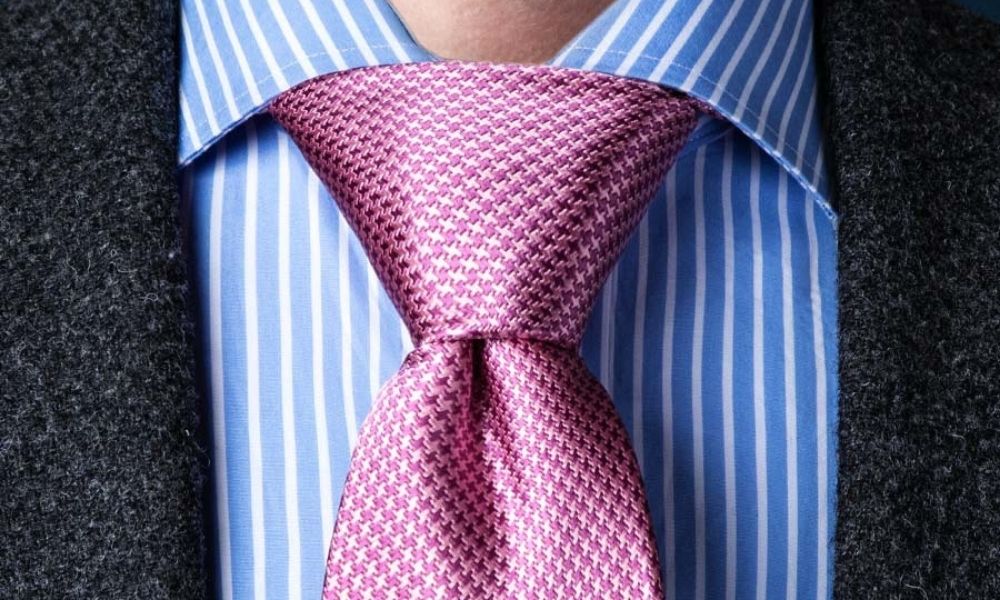
2. Half-Windsor Knot
The half-Windsor knot is a staple necktie style that strikes a fine balance between sophistication and simplicity. It features a more symmetrical and triangular shape than the simpler four-in-hand knot that offers a touch of formality without being overly bulky. This makes it an exceptionally versatile tie knot suitable for both business environments and social occasions. The half Windsor is notably less voluminous than the full Windsor, making it a more practical choice for most shirt collars.
The historical and cultural significance of the half-Windsor is rooted in its namesake, the Duke of Windsor, who was renowned for his sartorial elegance. Though the Duke himself favored a fuller knot, the half-Windsor emerged as a more manageable and popular adaptation. Nevertheless, the half-Windsor embodies the quintessential blend of British sophistication and a more modern streamlined aesthetic.
The half-Windsor knot is moderately easy to learn, presenting a step up from the simpler four-in-hand knot, yet not as complex as the full Windsor. The knot works best with medium to lightweight ties, as heavier fabrics may create an excessively bulky knot. The half-Windsor knot creates a balanced look with shirts that have medium to wide-spread collars. The symmetrical shape of the knot complements a wide range of professional attire, making it a reliable choice for business meetings or formal events.
How to tie a half-Windsor knot

Follow the instructions below to learn how to tie a half-Windsor knot.
- Position the tie and cross over: Place the tie around your neck, ensuring the wide end is on the right side and extends about 12 inches below the narrow end on the left. Cross the wide end over the narrow end towards the left.
- Under and up: Bring the wide end up under the narrow end and pull it through the loop around your neck.
- Down to the left: Bring the wide end down and pass it over to the left side.
- Wrap around: Cross the wide end around the front of the narrow end from left to right.
- Up through the loop: Bring the wide end up through the loop around your neck again.
- Through the knot: Thread the wide end down through the knot in front.
- Tighten and adjust: Hold the narrow end with one hand and slide the knot upward with the other to tighten. Adjust the knot to ensure it’s centered and symmetrical.
- Final touches: Make sure the wide end hangs lower than the narrow end and adjust for length and comfort. Shoot for a neat, tight knot with a distinct dimple below it to ensure the tie hangs smoothly.
3. Full Windsor Knot
The full Windsor knot (commonly known as the Windsor knot) is a hallmark of sartorial elegance in men’s fashion. Its symmetrical, wide, and triangular shape conveys a sense of formality and gravitas. This knot is particularly well-suited for formal events and business settings where a more distinguished and assertive look is desired. The Windsor is particularly flattering for individuals with a larger neck or facial structure, as it helps to balance out proportions, creating a harmonious and well-put-together appearance.

The Windsor knot’s origins are often attributed to the Duke of Windsor, although in actuality he wore a tie more akin to the four-in-hand with bulkier fabric. Nevertheless, the Windsor knot as we know it was inspired by and named in his honor. It is a symbol of meticulous grooming and an indicator of attention to detail. The knot’s substantial size makes it a statement piece that is often associated with power, leadership, and a refined taste in style.
Tying a Full Windsor knot is considered to be of moderate difficulty, requiring more steps and precision than simpler knots like the four-in-hand. It’s best suited for ties made of lighter materials, as thicker fabrics may result in an overly bulky knot. The size of the Windsor knot makes it ideal for shirts with wide-spread or cutaway collars, as these provide enough space to accommodate its breadth. The key to styling a Windsor is to ensure that the knot is tight and symmetrical, with a clean, horizontal line at the base. The tie should be adjusted so that the tip just reaches the belt buckle.
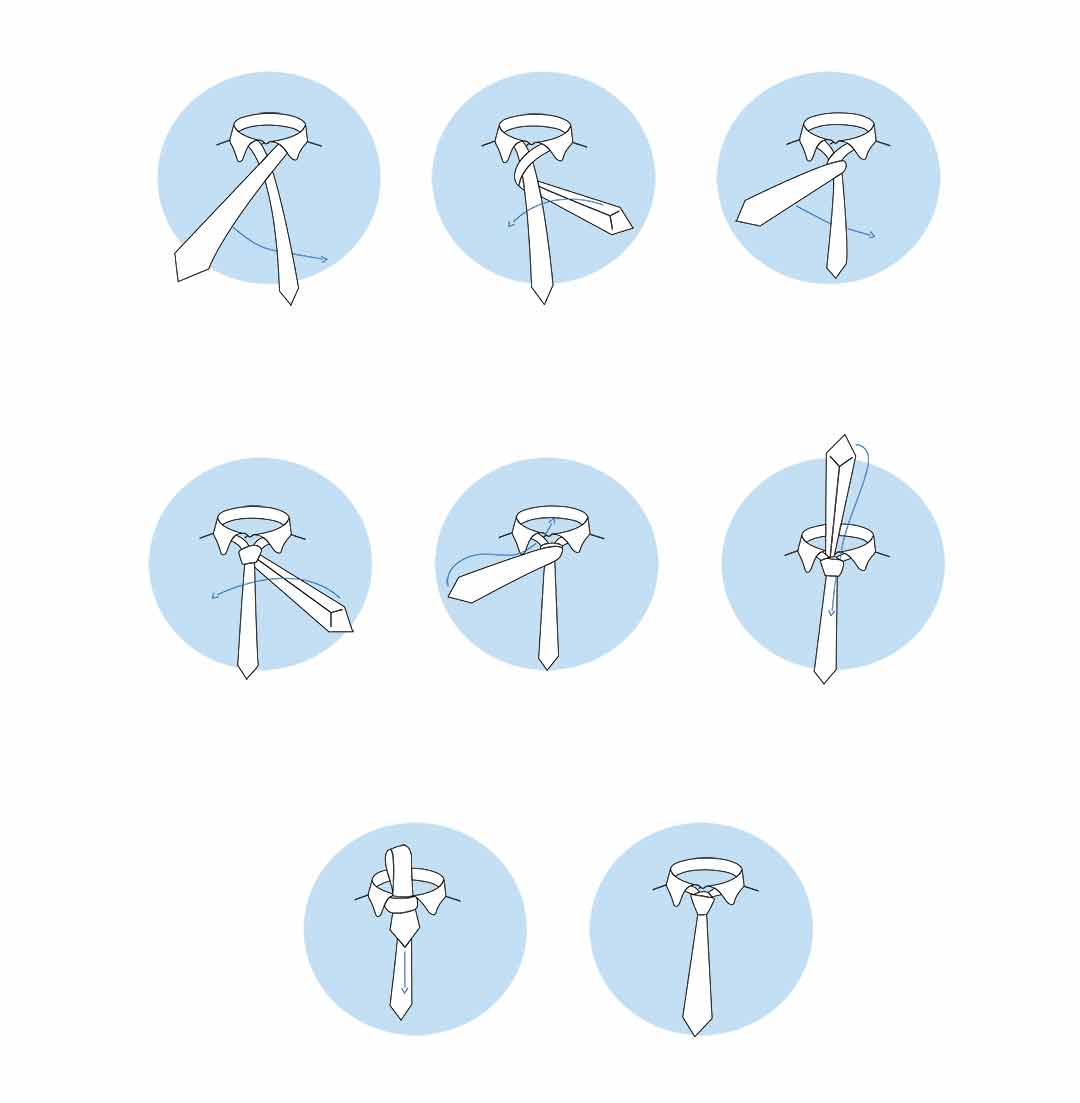
How to tie a full Windsor knot

Follow the instructions below to learn how to tie a full Windsor knot.
- Cross wide over narrow: Place the tie around your neck so that the wide end is on the right side and extends about 12 inches below the narrow end on your left. Cross the wide end over the narrow end to the left.
- Under and up: Bring the wide end up through the loop between the collar and your tie.
- Down to the left: Pull the wide end down towards the left side.
- Across the front: Bring the wide end across the front to the right, over the narrow end.
- Up through the loop again: Bring the wide end up through the loop again, this time from underneath.
- Down through the knot: Bring the wide end down through the knot in front.
- Wrap around the front: Cross the wide end horizontally across the front from right to left.
- Up through the loop a final time: Bring the wide end up through the loop a final time.
- Down through the loop and tighten: Pull the wide end down through the loop you’ve just made in the front and tighten the knot by pulling down on the wide end while holding the narrow end steady. Adjust the knot to ensure it’s centered and symmetrical.
4. Bow Tie
The bow tie knot has long been a symbol of sophistication and intellectual flair in men’s fashion. The bow tie’s charm and distinctiveness stand out in a sea of traditional neckties, conveying a unique blend of elegance and personality.

The bow tie traces its origins to Croatian mercenaries serving in the French army during the Thirty Years’ War (1618-1648), who tied cloth around their necks to secure the tops of their military jackets. The French called this a “cravate”, which is a corrupted form of the word “Croat”. The cravat caught the attention of the Parisians when Croatian soldiers were presented to the French King Louis XIII. The style was particularly noted for its decorative and distinctive manner of tying, which was quite different from the more utilitarian neckwear of the time. The king, impressed by this fashion accessory, made the cravate a mandatory accessory for royal gatherings, thus giving it a significant status symbol. The bow tie has since been embraced by various figures from academics and scientists to entertainers and politicians, symbolizing everything from non-conformity to high fashion. The bow tie has fluctuated in popularity through the years but has nonetheless retained a loyal following for its vintage appeal and ability to add a touch of formal panache or quirky charm to an outfit.
Tying a bow tie is often perceived as more challenging than tying a long necktie, but with practice, it can be mastered. The tie used should be of appropriate length for the wearer’s neck size and is typically made of silk or a silk-like material for formal occasions, and cotton or wool for casual wear. Aim for a balanced look where both ends are equal in size and shape, and the knot is snug but not overly tight. The beauty of a bow tie lies in its slight imperfections, which add character and signify that it is indeed hand-tied. Bow ties are a staple for black-tie events as a critical part of the tuxedo ensemble, but they also work well for a smart casual look, paired with a blazer or a suit without a jacket. The key to wearing a bow tie is confidence; it’s a bold choice that makes a statement about the wearer’s sense of style and individuality.
How to tie a bow tie
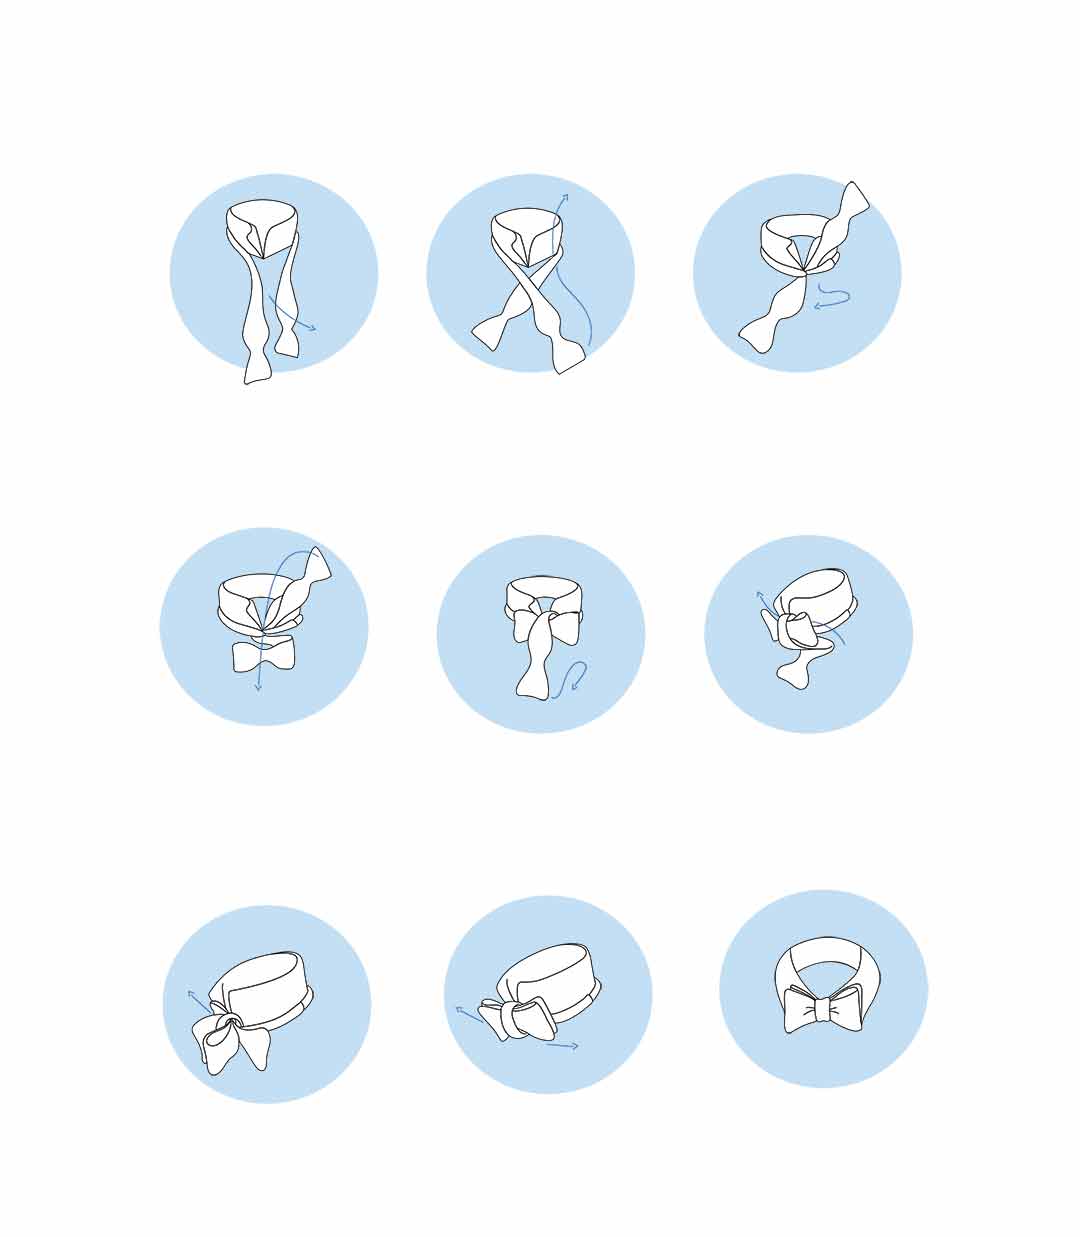
Follow the instructions below to learn how to knot a bow tie.
- Place the tie: Place the bow tie around your neck, ensuring one end hangs lower than the other.
- Cross and loop: Cross the longer end over the shorter end and then bring it up through the neck loop from underneath.
- Form the base bow: Fold the shorter end to create the initial bow shape.
- Lay the longer end over: Lay the longer end over the center of the bow shape you just formed.
- Form the back part of the bow: Fold the longer end back upon itself to make the back half of the bow.
- Pull through the loop: Pull this folded part through the loop behind the bow.
- Adjust the loops: Pull both loops of the bow tight.
- Shape the bow: Shape the bow by pulling and adjusting the loops and the ends.
- Final adjustment: Give the bow tie a final adjustment to ensure it is symmetrical and lays flat against the collar.
5. Prince Albert Knot
The Prince Albert tie knot is a dapper and slightly more elaborate variation of the classic Victoria knot and is sometimes known as the double four-in-hand. Its main selling points are its elegant and refined appearance, which is a bit bulkier than the four-in-hand. The Prince Albert produces a medium-sized knot that holds its shape well and accentuates bolder patterns and colors.
This necktie’s historical roots are not clearly defined, as there is in fact no evidence linking it directly to Prince Albert, Queen Victoria’s consort. Nonetheless, its association with royalty has given it a sense of sartorial prestige. The Prince Albert knot’s aesthetic, characterized by its crisp and slightly asymmetrical look, makes it suitable for a range of occasions, from formal events to business casual settings.
The Prince Albert knot is relatively easy to master, especially for those already familiar with the four-in-hand knot. It involves wrapping the wide end around the narrow end twice, which creates an additional fold that adds to the knot’s distinctiveness. The best type of tie for the Prince Albert knot is one made from a thicker fabric, as it helps the knot stand out and maintain its form. It’s particularly suited for long ties, as the double wrap requires a bit more fabric. Stylistically, the Prince Albert knot pairs well with narrow collars due to its slender shape.
How to tie a Prince Albert knot
Follow the instructions below to learn how to tie a Prince Albert knot necktie.
- Position the tie: Lay the tie around your neck with the wide end on the right side, hanging lower than the narrow end on the left.
- Cross wide over narrow: Cross the wide end over the narrow end towards the left side.
- Loop around: Wrap the wide end around the narrow end once, bringing it back to the right side.
- Repeat loop: Wrap the wide end around the narrow end a second time, ending again on the right side.
- Bring up: Bring the wide end up from underneath and through the neck loop.
- Down through loops: Guide the wide end down through the loops you’ve made in front.
- Tighten the knot: Pull the wide end through and tighten the knot carefully to shape it.
- Adjust: Finally, adjust the tie so that the knot sits neatly against the collar and the front of the tie hangs straight.
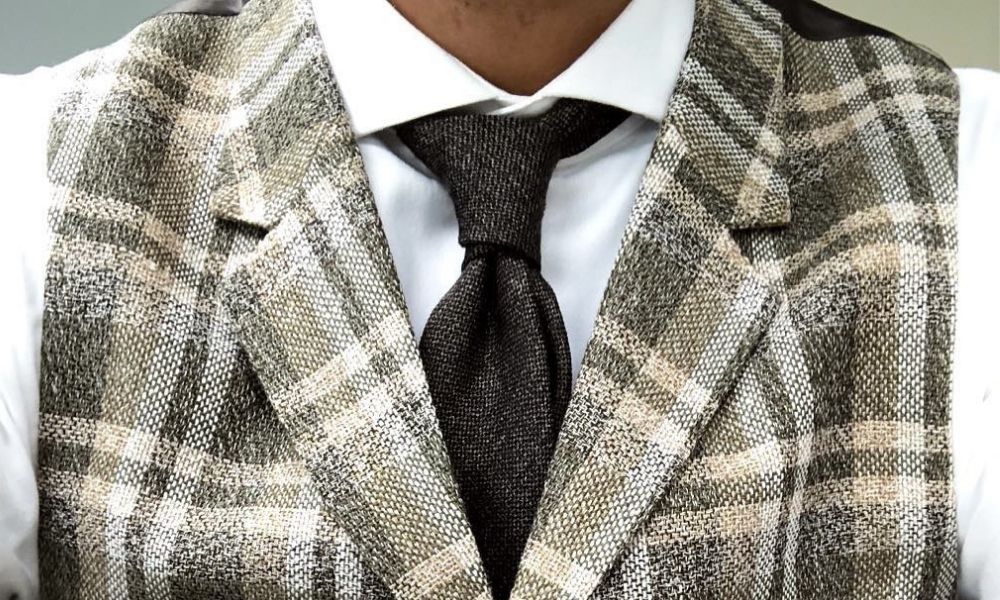
6. Pratt Knot (Shelby Knot)
The Pratt knot (also known as the Shelby knot) strikes a balance between the minimalist four-in-hand knot and the more ostentatious Windsor knot. It is symmetrical like the Windsor, yet retains the streamlined elegance of the four-in-hand. Given its moderate size and shape, the Pratt knot is a versatile choice for both professional and casual environments, allowing the wearer to maintain a polished look without excessive effort.
This knot is named after its creator Jerry Pratt, an employee of the US Chamber of Commerce who created it in the 1950s. However, it wasn’t until the 1980s that the Pratt knot gained widespread popularity, when Minneapolis WCCO television reporter Don Shelby wore it on air at Pratt’s insistence. Its fame was further cemented after being featured in The New York Times and the New York Daily Telegraph, which praised the Pratt knot’s symmetry, tidy precision, and ease of tying.
The Pratt knot is relatively easy to learn, even for those who are new to tie-knotting. It is well-suited for most tie types but is particularly accommodating for medium-weight fabrics. The Pratt knot works best with slightly wider neckties and can complement a variety of collar styles, from the classic point collar to a more spread collar. Aim for a dimple just below the knot for added sophistication.
How to tie a Pratt knot
Follow the instructions below to learn how to tie a Pratt knot.
- Starting position: Start with the tie around your neck, the seam facing outward, the wide end on the right side and longer than the narrow end on the left.
- Crossing over: Cross the wide end under the narrow end from right to left, keeping the seam facing outward.
- First loop: Loop the wide end over the narrow end and pull it upwards through the neck loop, then bring it down, flipping the front side to face forward.
- Second loop: Take the wide end horizontally across the front of the knot from right to left.
- Final loop: Pull the wide end up behind the knot, loop it over the top, and push it down through the front loop of the knot.
- Tighten the knot: Tighten the knot by pulling down on the wide end and adjust for symmetry and neatness.
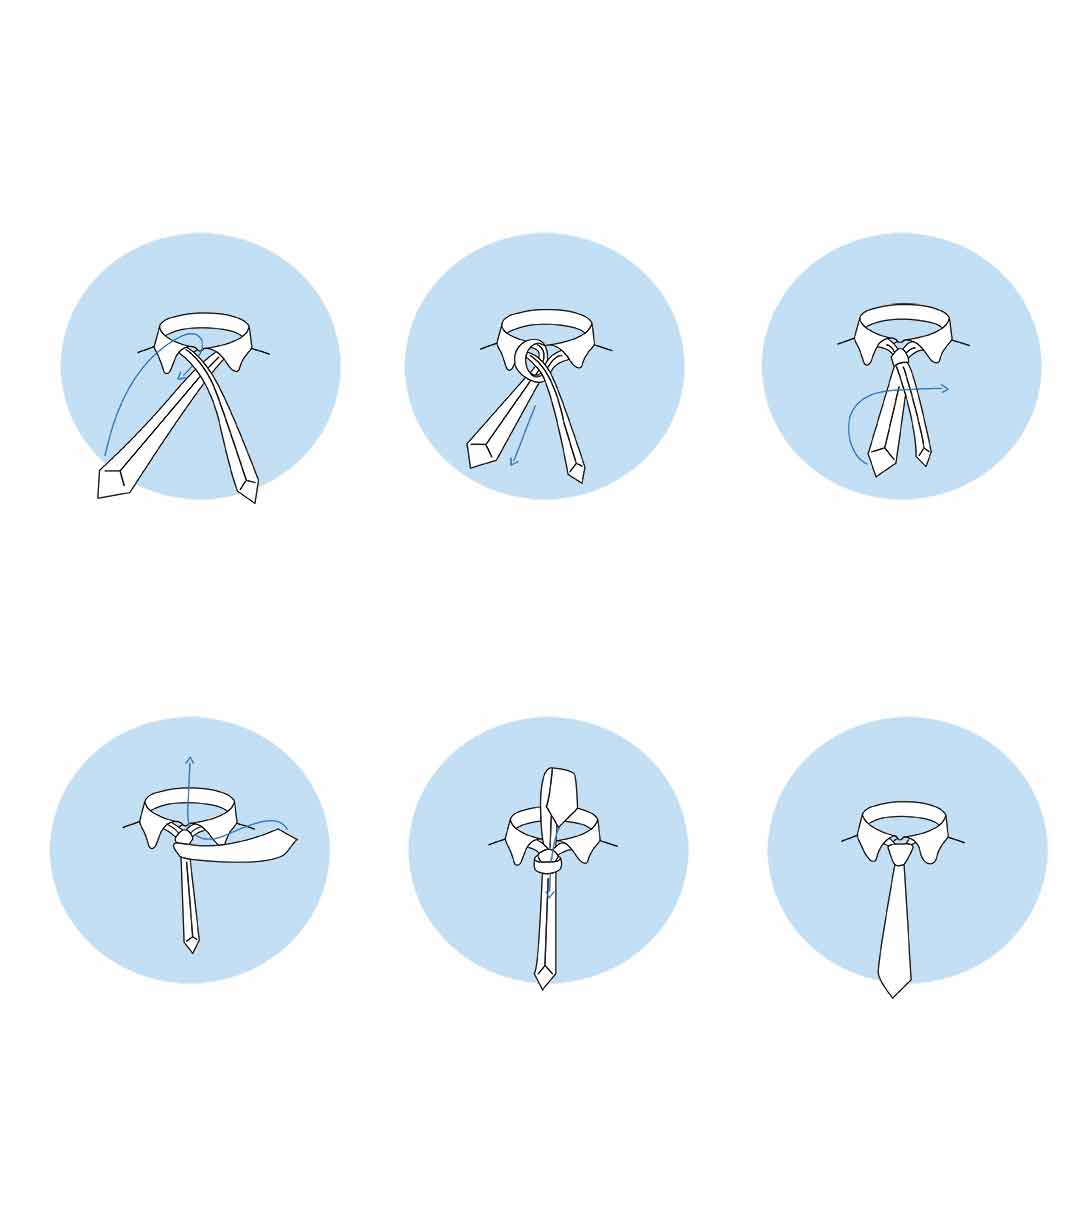
7. Eldredge Knot
The Eldredge tie knot is a complex and intricate knot that has gained popularity among sartorial enthusiasts for its distinctive and ornate pattern. Unlike traditional tie knots like the four-in-hand and Windsor variants, the Eldredge commands attention and showcases a level of sophistication and finesse. Due to its complexity and the attention it draws, it’s advisable to reserve this knot for less formal or creative settings where personal style is celebrated.

Jeffrey Eldredge created the eponymous Eldredge knot in 2007 out of a desire for innovation and variety in men’s necktie knots. He wanted something distinct to break away from the ubiquity of traditional tie knots. The Eldredge knot gained popularity through internet forums and social media platforms, where enthusiasts of tie knots shared and discussed innovative ways of tie styling. Eldredge’s invention represents the spirit of modern sartorial experimentation, where personal expression and uniqueness are highly valued.
Tying the Eldredge knot is a challenge due to its complicated weaving and layering. It requires a longer tie than usual to accommodate the extensive wrapping, and a thinner or more flexible fabric is recommended to manage the complexity of the knot. Silk ties with a solid color or subtle patterns tend to highlight the knot’s intricacies without overwhelming the eye. It is best to style the Eldredge knot with an understated suit and shirt to let the knot take center stage. A semi-spread or cutaway collar provides the necessary space for the knot to be displayed prominently.
How to tie an Eldredge knot

Follow the instructions below to learn how to tie an Eldredge knot.
- Place the tie: Start with the wide end of the tie on your right side and the narrow end on your left. The narrow end should be positioned slightly above your belly button.
- Cross over: Cross the wide end over the narrow end.
- Loop around: Loop the wide end under the narrow end and up through the neck loop.
- Pull down: Bring the wide end down towards the front.
- Cross over: Cross the wide end over to the opposite side.
- Up through the neck loop: Bring the wide end up through the neck loop from underneath.
- Down through the loop: Pull the wide end down and through the loop you just created in front.
- Tighten the knot: Tighten the knot by pulling on the wide end and adjust it to sit snugly in the center.
- Create a horizontal band: Cross the wide end horizontally behind the knot and bring it to the opposite side.
- Pull up: Bring the wide end up through the neck loop again from underneath.
- Thread through the horizontal band: Pull the wide end through the horizontal band you created in step 9.
- Adjust the horizontal band: Adjust the band to ensure it’s flat and smooth.
- Bring down the wide end: Bring the wide end down to the front on the opposite side of the knot.
- Loop up and through: Loop the wide end up through the neck loop from underneath on the same side as the knot.
- Pull through the knot: Pull the wide end down through the knot loop you created in the previous step.
- Adjust the completed knot: Tighten and adjust the knot and the rest of the tie to have a neat, triangular structure at the front.
8. Trinity Knot
The Trinity tie knot is a relatively recent addition to the repertoire of necktie styles, known for its intricate design and three-fold symmetry which evokes the Celtic Triquetra knot. Its main appeal lies in its visual complexity and aesthetic balance, which make it an eye-catching statement piece. The Trinity knot is most appropriate for occasions where a touch of personal style is encouraged and can serve as a conversation starter.
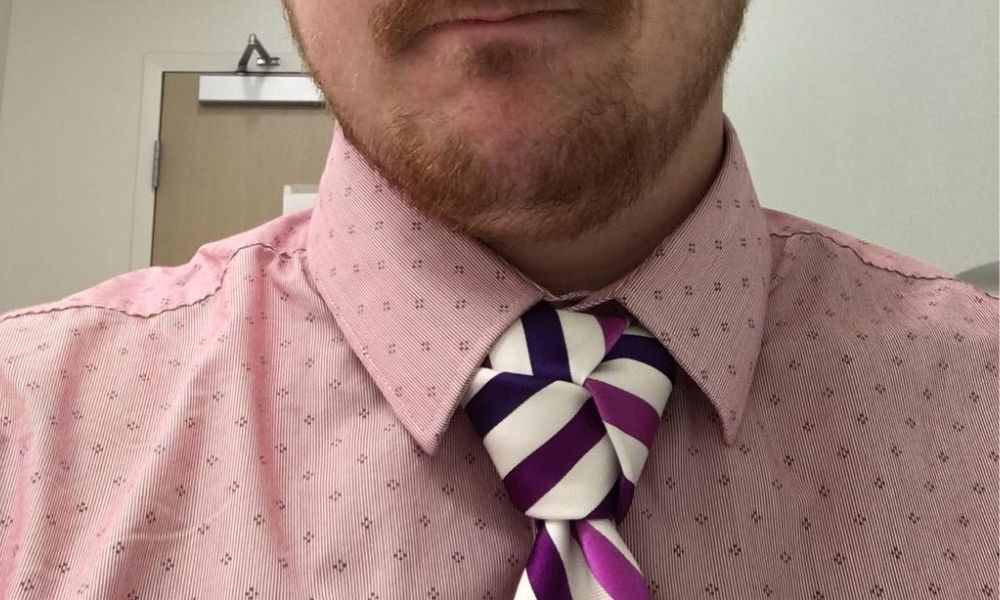
The Trinity tie knot is not just a fashion statement but carries with it a deep historical significance. Its design originates from the ancient Celtic Triquetra symbol, which has been used across various cultures and symbolizes concepts such as the interconnectedness of life or spiritual elements. In Christian symbolism, the Triquetra represents the Holy Trinity. The tie knot variant of this ancient symbol is a relatively modern innovation in men’s fashion, known for its three-way symmetry and decorative appearance.
Tying the Trinity knot is challenging due to its multiple steps and the precision required to achieve the desired look. It’s best suited for thinner and narrower ties to reduce bulkiness, although adventurous dressers often lean into the bold styling with wider and thicker ties. The Trinity knot’s size is slightly larger than the Windsor and is best paired with wide-collar shirts.
How to tie a Trinity knot
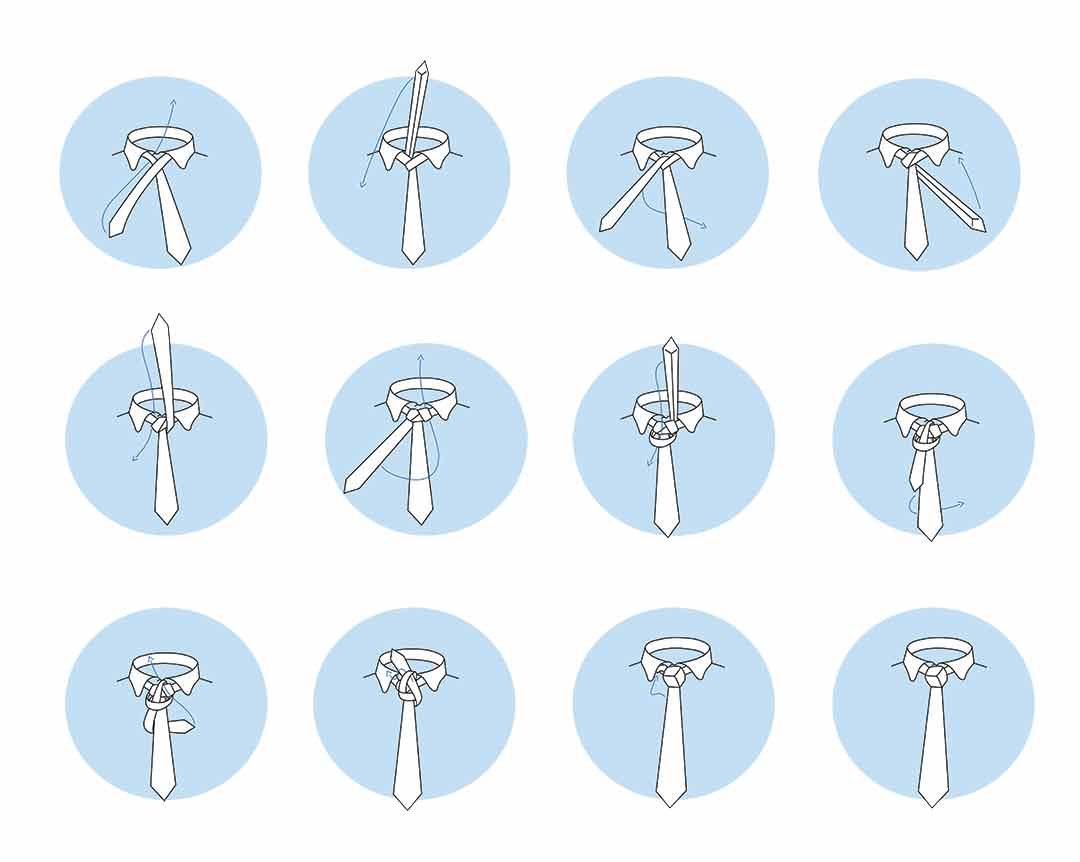
Follow the instructions below to learn how to tie a Trinity knot necktie.
- Drape the tie: Place the tie around your neck with the seam facing outward and the thick end on the left. Set the thick end at the position you want the finished length to be.
- Cross over: Cross the thin end over the thick end to the right.
- Loop around: Bring the thin end under the thick end and to the left.
- Up and through: Take the thin end up, over the neck loop from underneath, and to the right.
- Cross over: Move the thin end over the front to the left.
- Up and through again: Loop the thin end over and down through the neck loop and bring it to the right.
- Across the front: Take the thin end horizontally across the front to the left again.
- Up and through the neck loop: Bring the thin end up under the neck loop and down through the loop you’ve just made in the front.
- Down to the left: Pull the thin end down to the left and then around the back to the right.
- Up to the center: Take the thin end up to the center, towards neck loop.
- Through the neck loop: Work the thin end through the neck loop and down to the left.
- Tuck and adjust: Tuck the remaining thin end behind the neck loop on the left and adjust the tie knot to tighten and center it with your collar.
What are some more adventurous tie knots?
There are more adventurous tie knots that exist beyond the essentials to elevate your style. These knots are intricate and eye-catching to ensure that others will take note of your sartorial elegance. These elaborate knots are popular among people trying to stand out from the crowd, unlike those simply worn for functionality. However, despite their complexity and sophistication, you can sport more adventurous knots no matter the occasion. Below are five more adventurous tie knots to add to your repertoire.
Cafe Knot
View in gallery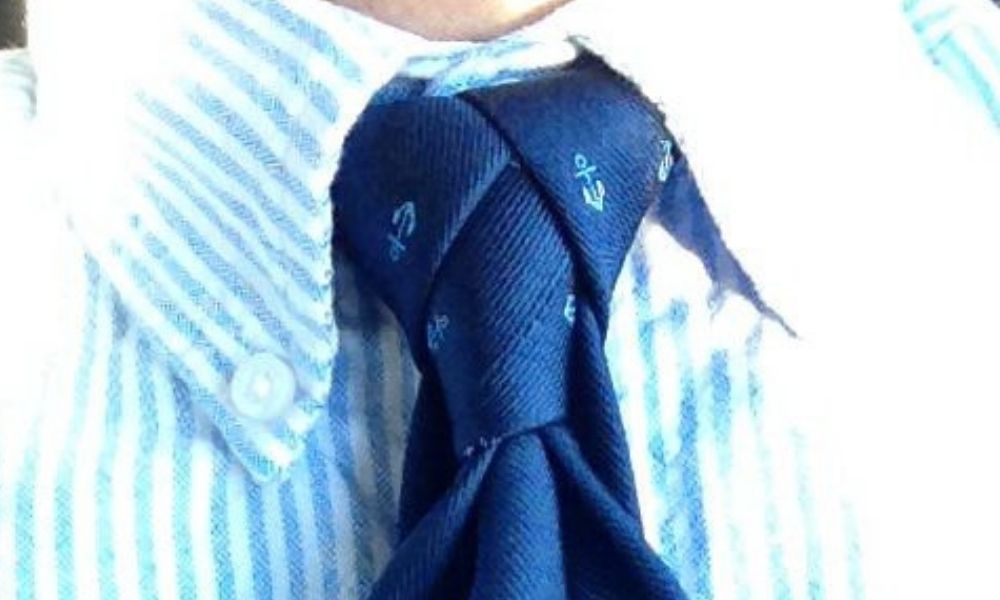
The Café Knot is a ridiculously difficult knot to tie, but impressive if you’re smooth enough to hack it.
It was a trending style among café-goers early in the 20th Century, signifying how skilled one was at knot-tying. While no walk in the park, the result is stunning, with great symmetry and layering. The Café Knot accessorizes well with your casual suit during social gatherings.
The Van Wijk Knot
View in gallery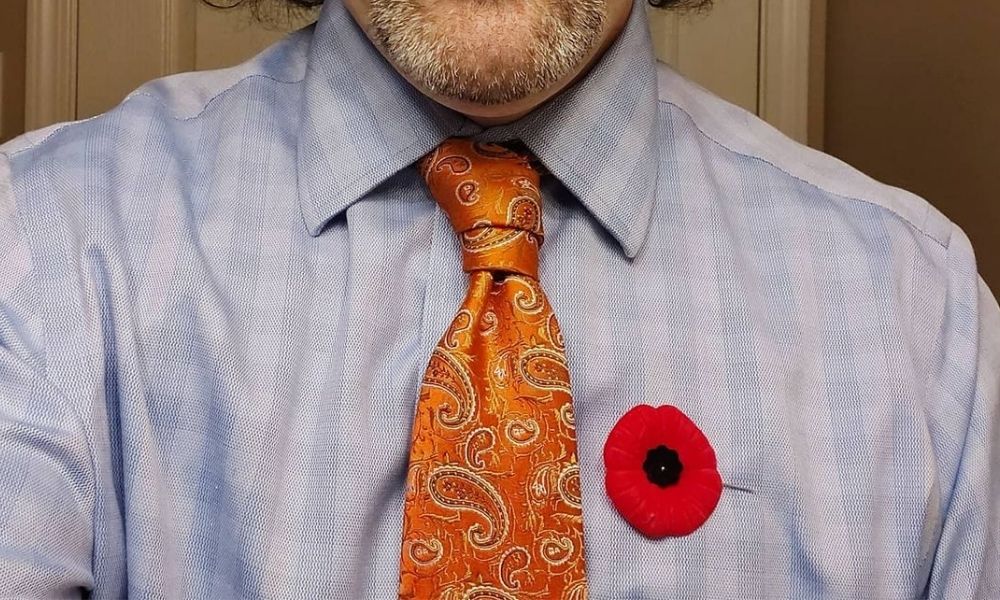
A creatively designed knot was invented by an artist, Lisa van Wijk. It’s an adaption from the Prince Albert Knot that debuted much earlier, adding a visual twist with three loops for an amazing cascading effect. This makes the Van Wijk Knot one of the tallest wearable tie knots available.
Merovingian/Ediety Knot
View in gallery
The Merovingian Knot was popularized by the character by the same name in The Matrix, although it’s much older. It was initially known as the Ediety Knot, and is thought to have originated in the 1920s. It’s easy to see the art-deco influence!
Its beauty lies in the phenomenon of your big tie appearing to be wearing a smaller tie. A delightful concept and sight to behold; you can spice it up by using a striped tie resulting in fascinating patterns.
Since the knot has a striking appearance, it is best worn to casual social events. Just keep in mind, cracking this knot is no mean feat. You must be ready to practice before you can wear it out.
Fishbone Knot
View in gallery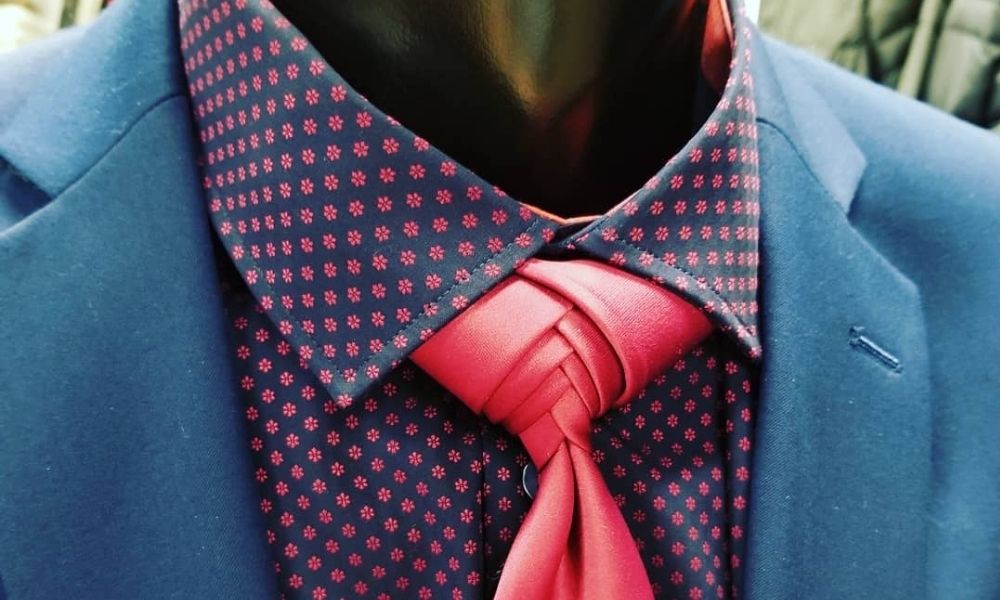
The Fishbone Knot is an elaborate knot that’s multi-layered with some resemblance to Eldredge Knot. The knot looks like a fishbone, hence its name.
Although it appears complicated, it’s made up of a series of repetitive steps that if you can get a hang of, you’ll be home and dry every time. It’s a fascinating knot that has matchless symmetry and hits home with a striking impression.
Since this is a large knot, you require a long tie to hack it. It’s fitting to wear for casual social occasions where you won’t mind standing out with this conversation-starter.
Truelove Knot
View in gallery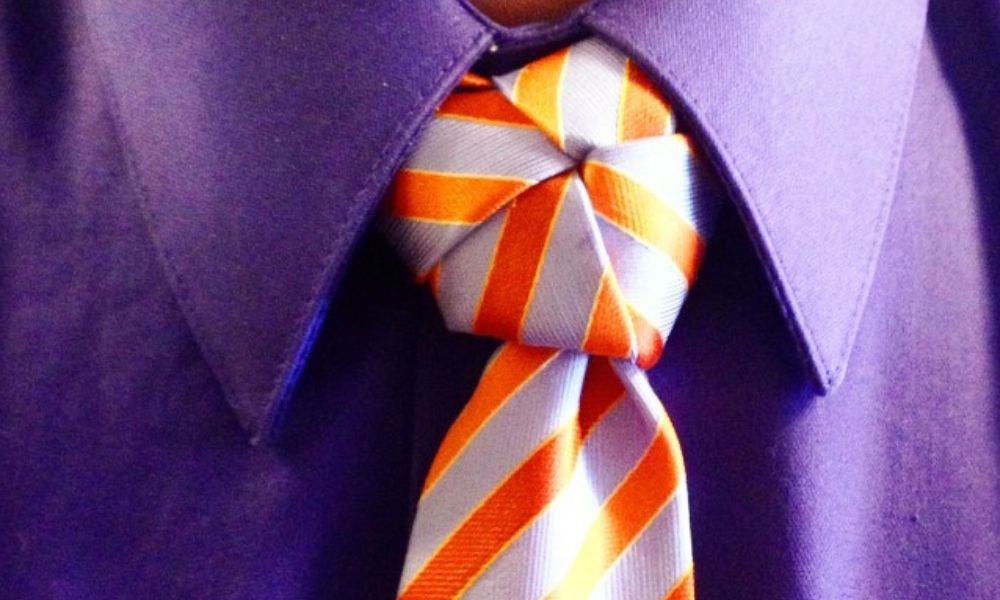
A well-done Truelove Knot looks like a heart, with four quadrants to distinguish it from the rest of the tie knots. You can consider going out with this tie knot for a romantic dinner. How cool is that?
But I must warn you, it takes practice to perfect a Truelove Knot, otherwise, it’ll present a visual mess rather than something suaver. Once you’ve done your homework, though, you can even try it on a striped tie to bring out interesting geometric patterns.
Tying it all together
Tie knots are important for a man’s wardrobe as they enable personal expression and showcase your meticulous attention to detail. Classic knots like the Four-in-Hand or Half-Windsor offer simplicity, balance, and sophistication, each suitable for different occasions and collars. Switching your knots from the common options to more adventurous offerings shows unique charm and experimental style. Mastering these diverse knots ensures versatility in style for any event, from formal to casual, and lets you leave a lasting impression.